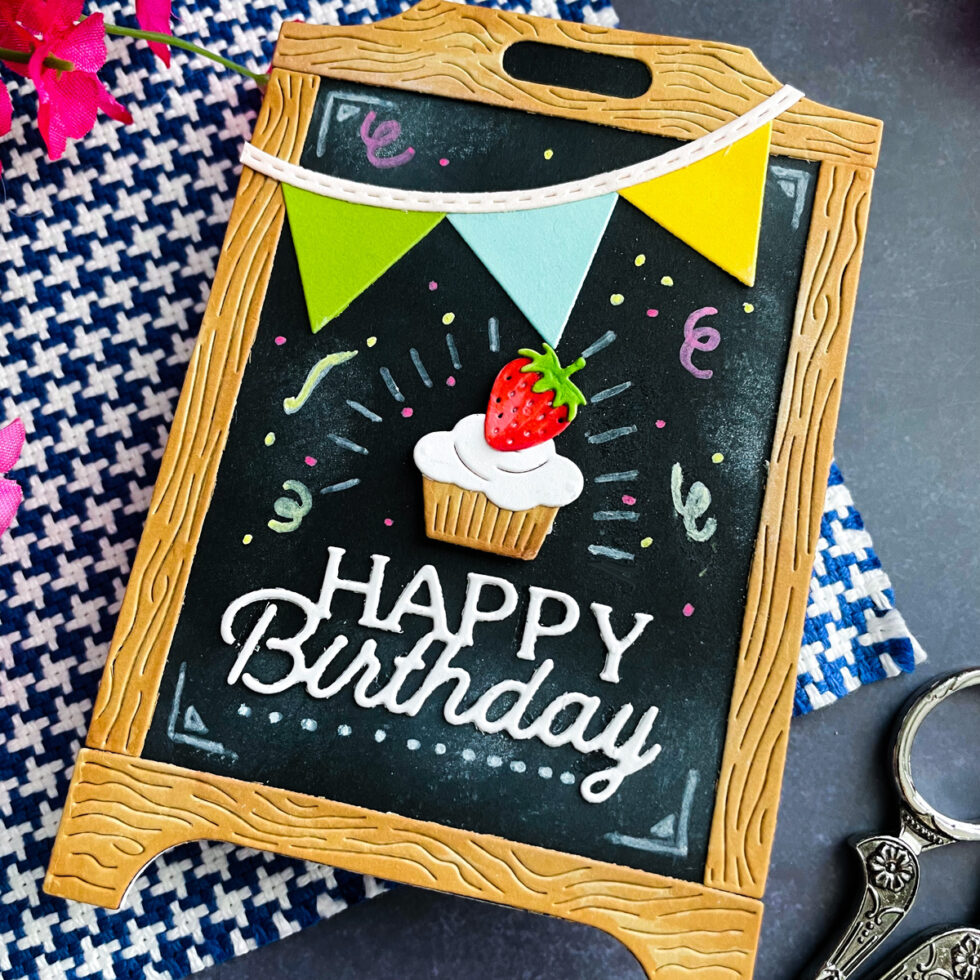
Hello friends! Today I’m sharing a super fun and unique project: a birthday chalkboard stand card! I love creating interactive or shaped cards that stand out, and this one feels like a little piece of cafe decor brought to life.
The base of this card was created using the Pink Lemonade Stand Etched Dieswith Raven and Fawn cardstock. To give the black center a realistic chalkboard look, I lightly blended some white pigment ink around the edges to mimic chalk dust. I even cut the entire card base into the shape of the stand so it looks perfect from every angle!
The chalkboard is decorated with a festive banner die-cut from Bellini, Rainforest, Waterfall, and Beeswax cardstock. For the sweet treat in the center, I combined the cupcake from the Made With Love Etched Dies by Tina Smithwith a tiny strawberry from the Pink Lemonade Stand set. The finishing touch was using acrylic markers to draw little doodles and confetti, making it look like a hand-drawn chalkboard masterpiece.
Constructing the Stand: Use the Pink Lemonade Stand Etched Dies to cut the frame from Fawn cardstock (for that wood-grain look) and the chalkboard center from Raven cardstock. Ensure the card base itself is die-cut into the stand shape for a cohesive look.
Creating the Chalkboard Effect: Take a bit of white pigment ink and lightly smudge it around the edges of the black cardstock to create that “used” chalkboard texture.
Adding the Party Decor: Die-cut the banner pieces from a colorful mix of Bellini, Rainforest, Waterfall, and Beeswax cardstock. Adhere the banner string across the top of the stand.
The Cupcake Focal Point: Die-cut the cupcake using the Made With Love Etched Dies and top it with a strawberry from the Pink Lemonade Stand set. Adhere this to the center of the chalkboard.
The Sentiment: For the “Happy Birthday” message, I used the Layered Happy Birthday Etched Dies. I die-cut the sentiment twice and stacked the layers to give it a bit of a 3D lift against the flat chalkboard.
Hand-Drawn Details: Use acrylic markers to draw chalk-style accents, streamers, and confetti around the cupcake and sentiment to complete the look.
I had so much fun leaning into the “chalkboard art” style for this card. It’s a great way to use your markers and dies in a creative new way! Thank you so much for stopping by.
Happy Crafting!
Heejung Hunsberger
SUPPLY LIST
When you make purchases through affiliate links, it won’t cost you anything extra. Thank you so much for your support! 💗
2 thoughts on “Whimsical Chalkboard Stand Birthday Card”
That’s such a lovely idea, I really love the cafe decor vibe you’ve achieved with this card!


That’s such a lovely idea, I really love the cafe decor vibe you’ve achieved with this card!
thank you so much