Get ready for the exciting June Club releases from Spellbinders, featuring nautical themes perfect for birthdays and well wishes. I’ve been creating with the Stitching Die Club, BetterPress Club, and theDeluxe Caboodle Value Club Bonus Die, and I can’t wait to share my creations with you!
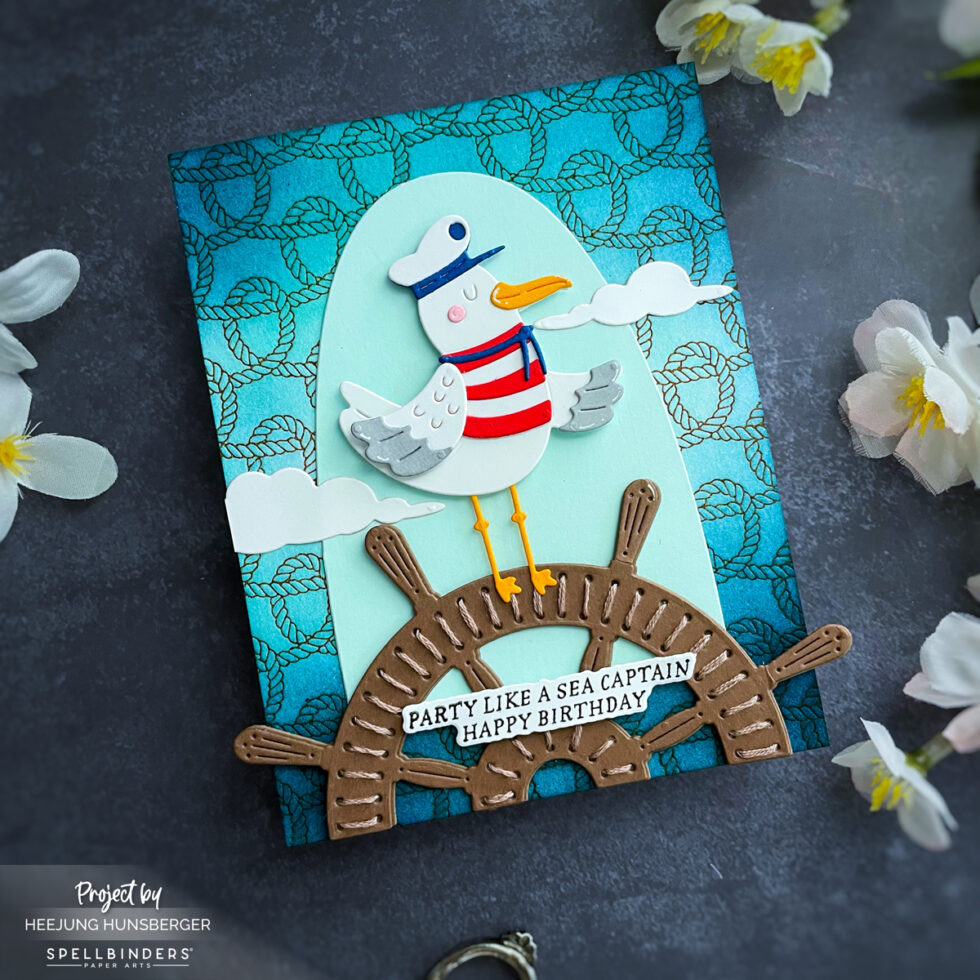
Create BetterPress Background: Press the rope pattern plate from the BetterPress Club onto the card base using Bark BetterPress Ink. Then, blend the edges with Uncharted Mariner Ink for added depth.
Die-cut Arched Background: Die-cut an arched shape from Seaside cardstock to create the background element that will sit in the middle of the card.
Die-cut and Stitch Ship’s Wheel: Die-cut the ship’s wheel from acorn cardstock with the June Stitching Die Club. Stitch through the pre-punched holes for detail.
Die-cut and Assemble Seagull
Die-cut Clouds
Assemble Card:
Attach the arched background to the center of the card. Secure the stitched ship’s wheel at the bottom with foam tape, then place the seagull on top.
Arrange the small clouds around the seagull, and die-cut the “Party Like a Sea Captain Happy Birthday” sentiment to attach to the ship’s wheel.
.
Anchors Away Sailboat Card
Here’s a charming sailing card that highlights the versatility of this month’s clubs. The deep blue background features amazing texture from the Embossing Club, while the cute sailboat uses the bonus die from the Deluxe Carboodle Value Club—perfect for the design!
Prepare Card Base: Using Indigo cardstock, create an A2 (4.25″ x 5.5″) size card base.
Emboss Background: Emboss the Indigo card base using the June Embossing Club die for a textured background.
Prepare Waves: Die-cut wave shapes from Cosmic Sky, Cascade, and seaside cardstocks using the June Stitching Die Club wave die.
Stitch Waves: Stitch along the pre-punched holes on the die-cut wave pieces using silver metallic thread.
Assemble Waves: Stick the seaside wave piece to the bottom of the card base. Layer the Cascade wave on top with foam tape for dimension, then add the Cosmic Sky wave on top of the Cascade with foam tape to create layered waves.to create layered waves.
Die-cut and Assemble a Sailboat
Die-cut Clouds
Die-cut Anchor on silver metallic card stock
Assemble Card: Attach the sailboat to the waves with foam tape for dimension. Add die-cut clouds in the upper background around the sailboat. Finally, die-cut the sentiment “Anchors Away to an Amazing Birthday” and position it at the bottom of the card.
I had a great time creating these cards, and I hope they inspire you to explore the amazing possibilities with the Spellbinders June Clubs. Whether you’re an experienced crafter or just beginning your creative journey, these sets provide endless opportunities for beautiful projects.
Happy crafting!
XOXO
Heejung
SUPPLIES LIST
When you make purchases through affiliate links, it won’t cost you anything extra. I am grateful for your support!